


⭕️ Fast Production-Grade External Integrations with Selenium
Reliable, Production-Grade External Integrations requiring Minimal Buy-In and Engineering Time

‘Speed above all else’ - a succinct, yet powerful principle that drives many of the day to day operations at Athelas. With this as one of our key operating tenets, engineering tools that enable us to work at speed are highly valuable to us. One such tool, which we’ve employed across the board for everything from complex external integrations to simple health checks, is Selenium.
In short, Selenium enables developers to write workflows that emulate a human manipulating a web browser. People have found plenty of creative uses for it across the internet, from automated flight booking to monitoring online shopping websites for the best prices. It’s an entirely different challenge altogether, however, to put Selenium to work in a production-grade environment.
In today’s post, we’re discussing:
Automating a manual workflow using Selenium and Python
Making an automated manual workflow production-grade
To remain on theme with what Athelas offers, we’ll stay within the field of healthcare for today’s article. Specifically, we’ll walk through an example of putting together a production-grade job that will be pulling key data from a public health website - vaccines.gov.
Work Through the Manual Flow & Take Notes
In essence, Selenium is a tool that automates someone clicking and typing in a browser. The first step here is obvious- walk a mile in your backend’s shoes! Perform the flow that you’re attempting to automate, while making a conscious effort to make as few clicks as possible. Break it down into single distinct actions that you execute, and then compare that to what Selenium affords you.
While you’re doing so, consider how you can turn this entire flow into blocked out steps. Just as you would not write one longwinded function- opt instead to split it into manageable, testable subroutines- do not just have one long Selenium flow. We will take our time later to automate each individual step, and add progress tracking & error handling as we go along.
I like to take detailed notes as I manually step through the flow that I am trying to automate, keeping track of details that may help me shorten or optimize the flow wherever possible. I keep the “Inspect Element” (Google Chrome) dialog open as I’m doing this, so I can check the source code to gauge the difficulty of automating these tasks.
Today, we are attempting to solve the simple problem: Given a Zip Code and a List of Preferred Vaccine Types, write a Selenium flow to fetch us the nearest location to us that has vaccine availability.
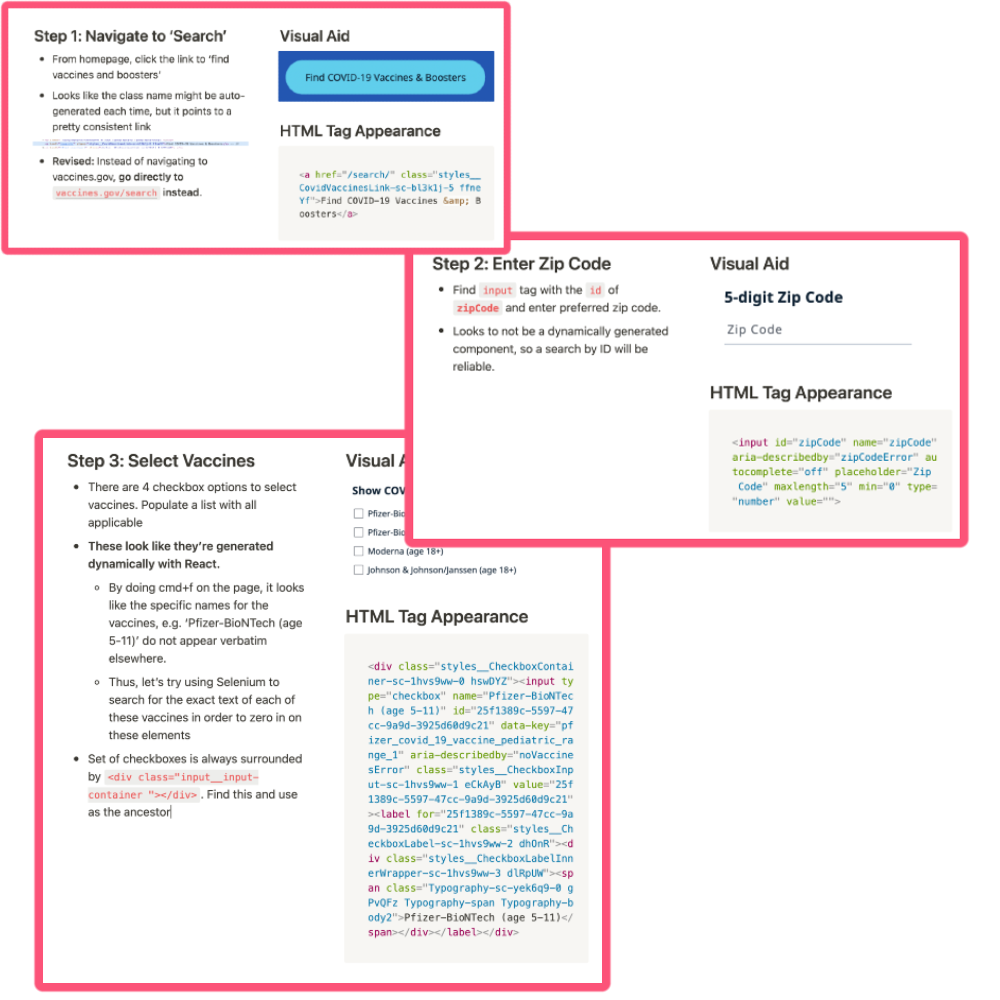
Let’s start by visiting vaccines.gov and going through that flow as a human would, taking detailed notes along the way. Below are some of the notes that I took for this flow.
There are many hurdles for Selenium developers that need to be engineered around, as they can sometimes confuse your workflows. For example, dynamically generated React components might have different names for identifying attributes such as class or id each time the page loads, and iframe elements can tend to hide the elements within them, unless you ask Selenium to ‘switch to’ the desired frame.
💡 Note: All of these are nuances that one can pick up on as they continue to develop with Selenium, but taking these notes, even as part of a cursory analysis, can cut development time by significant amounts later.
Here’s what I’ve distilled the essential steps of our flow down to.
Navigate to vaccines.gov/search
Enter the desired zip code
Select the desired vaccine types
Click the ‘Search for COVID-19 Vaccines’ button and select the top result.
Save & return the name and address of the vaccine site.
Implement the Golden Path
Your first task will be getting up and running with Selenium. The assumption here is that you have already installed & set up Selenium, but below are some of my tips for getting started.
Getting Started with Selenium
Get your desired browser driver for this automation, so you can deploy this to production. You can choose to emulate actions on any of the major browsers that have available drivers (e.g. Chrome’s ChromeDriver or Firefox’s GeckoDriver). At Athelas, we prefer to use Google’s chromedriver.
Check out the unofficial, community-written documentation on getting started here. I find it much more descriptive than the official documentation.
Ensure you’re running your code a lot during development and testing, and watching it work. I recommend using a code block similar to the following that runs your browser in a ‘headless’ form in production, but displays the browser window during testing. Ensure that you add the
—headlessargument to your Selenium’schrome_options.
Golden Path Automation- Step by Step
For the purpose of this article, we’re going to assume you have created an instance of the Chrome webdriver. We recommend you customize the chrome_options parameter to meet your needs, in addition to the recommendation provided above. Also included are some helpful imports that we will use later in this article.

This is where the fun begins- now that Selenium is set up, we can go ahead and start automating the flow, step-by-step.
Navigate to vaccines.gov/search- Opening a webpage
This step is fairly simple. We’ll be using Selenium’s get method to open the page.

Running the code yields a Chrome window (which helpfully indicates that it is being automated by test software) that shows the landing page for the vaccines.gov search.

Enter the Desired Zip Code- Locating Elements via ID

Our first step is to enter the desired zip code into the field labelled ‘5-digit Zip Code’. Let’s view this element using Chrome’s “Inspect Element” feature to see if it has any unique traits that will help Selenium find it.
💡 Note: A great way to figure out how to help Selenium identify an element on a page is by figuring out one of the element’s unique identifiers. For example, if the element is the only one of its kind with a
class,id, orname, you’re in luck.
Be warned, however- HTML is a flexible language, and pages will sometimes break rules, e.g. having more than one element with a certainid, even though that is technically not correct. Always check for edge cases!

After multiple reloads and careful analysis which we can corroborate with the notes that we took earlier, we can see that this element (the HTML input tag) will always have the attribute id=”zipCode”. Knowing this, let us have Selenium get this element, searching for an id attribute that is set to zipCode.

Finally, we’ll enter the zip code given in the zip_code string, and we’re good to go.
Select the Desired Vaccine Types- Locating Elements via XPath

Our next step is the select the desired vaccine types that the user has specified. First, let’s figure out how to reliably select these elements. Once again, let’s use ‘Inspect Element’ to take a look at these elements.

Unfortunately, it looks like this one is not going to be as easy. It appears that the class names in the checkbox’s element, and enclosing elements, are auto-generated by some sort of web framework. (Some more sleuthing in the page source yields that this was done by React).
For cases like this, I like to default to the most powerful tool available to Selenium developers when it comes to searching pages- XPath.
According to the selenium community documentation at https://selenium-python.readthedocs.io/locating-elements.html#locating-by-xpath, XPath is a powerful tool for searching within an XML document, and since many well-formed HTML documents abide by those same standards, XPath search can be used to find all sorts of elements in an HTML page.
I’ve opted to use an XPath search that will look for a span element that contains the exact wording of the vaccine that we want to opt for, e.g. ‘Pfizer-BioNTech (age 5-11)’.
As such, I will conduct a search for all span tags that contain the exact name of the vaccine I am looking to select. Here is an example:
//span[contains(text(), 'Pfizer-BioNTech (age 5-11')]Chrome’s “Inspect Element” is an excellent tool for interactive XPath searching as well. You can see below that by opening the console and entering my XPath Syntax as follows, Chrome helpfully highlights the element that an XPath search with my criteria yields: $x(“XPATH SYNTAX HERE“)

Now, we have verified the accuracy of our XPath search. I will assume at this step that the vaccine names to search for (verbatim) will be provided by the end user, in the form of a list. The checkboxes for each of these will then be searched for via XPath and clicked, in a similar fashion to what we did for the zip code field. Below is an example implementation:

Now our script opens the page, enters a zip code, and selects the appropriate vaccines. Let’s move onto the next step.
Click the ‘Search for COVID-19 Vaccines’ Button and get the Top Result- More Advanced XPath Searching
We can find and click the ‘Search for COVID-19 Vaccines’ button using XPath searches once again. Notice how I’ve specified that I’d like a button tag with the type set to submit, and how I’ve also requested that the text ‘Search for COVID-19 Vaccines’ is within the element that Selenium finds as well. You can add as many specific search criteria as you’d like when using an XPath, and I’d recommend you to adjust these until you consistently get the single correct element that you need.

Now, you’ll see that we’ve got a results page. Our job from here is quite simple- we select the top result, and see what vaccines are available. In this case, we’re looking to select the #1 result, CVS Pharmacy number 07774.

Once again, let’s use Inspect Element to help us figure out how to find this element on the webpage.

Notice how complex this element is. It’s composed of a div within a div within a div within an a tag, all of which are within an li tag. At first glance, the overlying li component seems like a difficult one to search for. The class appears to be auto-generated, and there seem to be no unique identifiers. However, we are lucky in that putting your mouse over any portion of this result rectangle and clicking will yield us the result page that we want- see the example below. (Try it!)

As such, we have lots of flexibility in finding the right element to click, as we can search for any one of these internal elements within the li tag, and then click it.
Taking a closer look, it appears that the div containing the site name also has an easily identifiable attribute, data-cy. Upon closer inspection, there is exactly one of these per vaccination site result, and clicking it yields us the page that we want. Using ‘Inspect Element’ to verify this shows us that running an XPath search for elements of this type yields us exactly as many results as there are vaccination site results on the page!

By enclosing the XPath that we used to identify all 50 of these result elements with parentheses, we can access the first XPath search result as if it were an array in the following way:

Finally, we get to the results page, and we can extract the information that we need.
Save and Return the Name/Address of the Site - One Last XPath Trick
Now, we have a page that looks like this:

All we want is the name of the site, and the address. We can take this opportunity to explore one more trick that XPath searching affords us. It’s fairly easy using ‘Inspect Element’ to determine how to glean the site name from the resulting webpage:
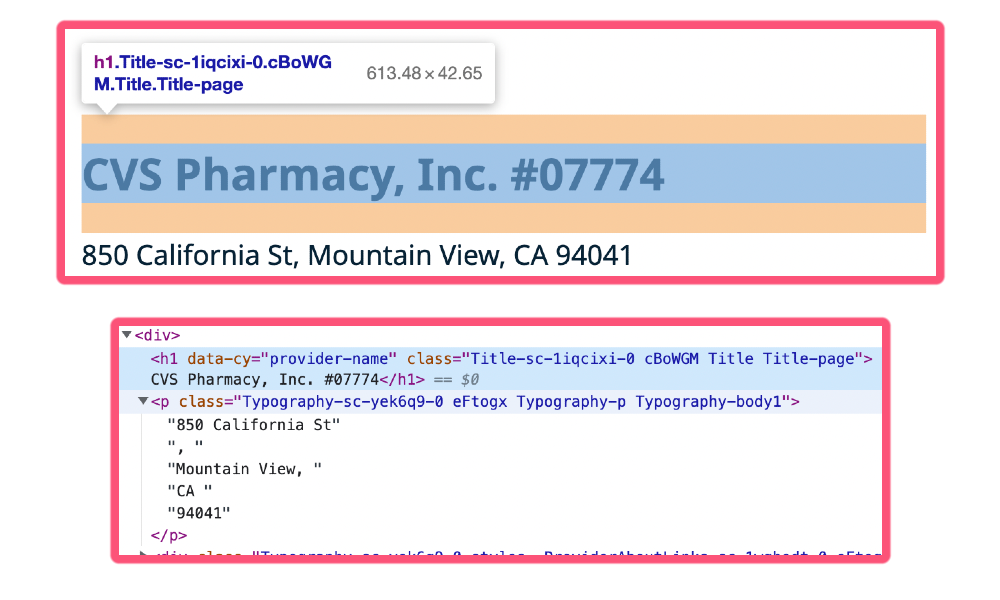
However, it’s quite difficult to find any unique identifiers in the p tag that contains the address. Luckily, since we have successfully identified the h1 that contains the site name, and since we are lucky enough to have both directly under the same div, we can use the notion of ‘sibling’ elements to identify the address element. The code for this is as follows:
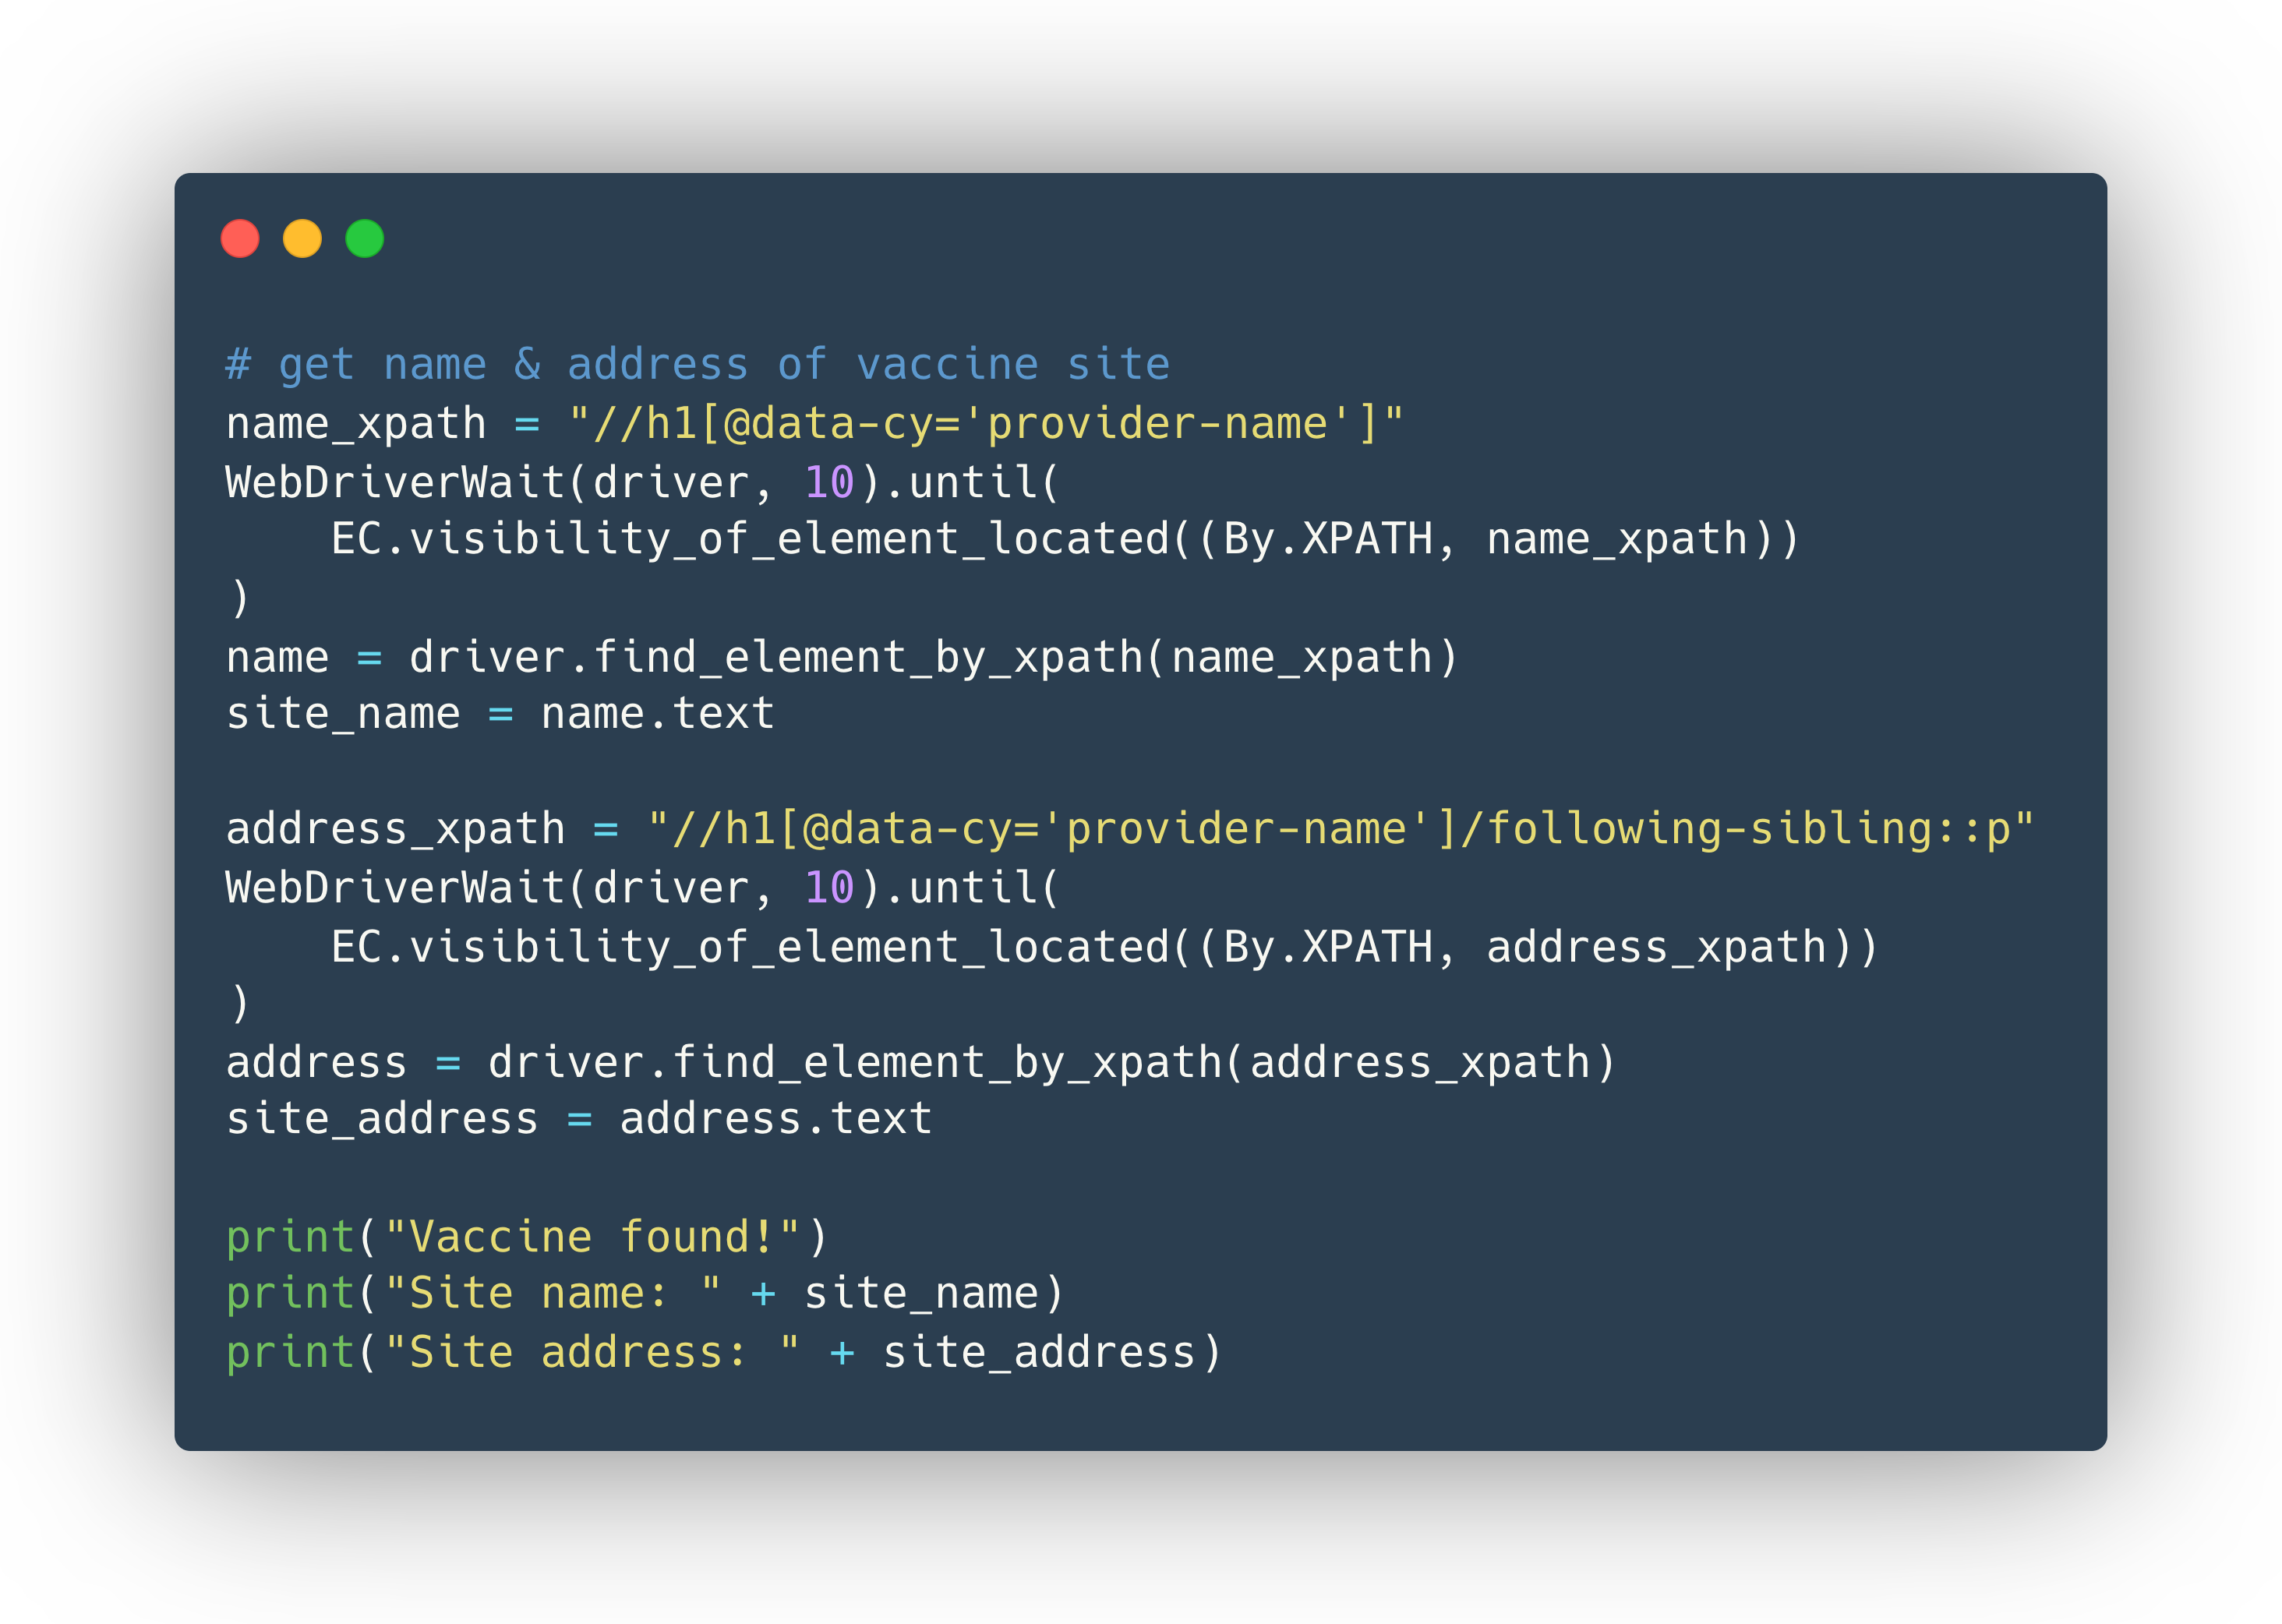
You’ll also note that this finally prints the information that we wanted directly to the console, which wraps up our flow!
Deploying to Production
You’ll want to deploy Selenium via an asynchronous task service. Selenium processes tend to take quite a while as they wait on page loading times, etc. so you’ll be much better of letting it run in the background. At Athelas, we have opted to deploy our Selenium on our Celery task cluster (read more about our Celery setup here!), but you may opt to deploy it via any other asynchronous task queuing service like Google Cloud Run or AWS Lambda.
Insight into Tasks: Idempotence & Step Tracking
How do we provide insight into the performance of our Selenium flows while also creating robust error-handling infrastructure? The answer lies in the simple idea of breaking a task down into separate steps.
We have already been working around this notion in this article- here are the steps for the flow that we designed earlier.
Navigate to vaccines.gov/search
Enter the desired zip code
Select the desired vaccine types
Click the ‘Search for COVID-19 Vaccines’ button and select the top result.
Save & return the name and address of the vaccine site.
By adding simple record keeping measures such as assigning a unique ID to each Selenium job and keeping track of which step each job is at, one can easily monitor key metrics like success rates, most commonly failed steps, etc.
Here is a mockup of an internal dashboard that may keep track of Selenium jobs, similar to what you may find at Athelas:

When Things Break: Handling Errors
We also need to handle the most painful part: error handling. Selenium flows fail- and that’s ok! They key to ensuring your Selenium flows are working is making sure that you are handling errors properly.
Knowing what step your jobs are at are one thing- but understanding what to do if a job fails at a certain step should be one of your main considerations when writing the job itself. You must ask key questions such as:
If the job fails here, can I restart from this current step?
If the job fails here, can I retry the entire flow from the beginning?
If the job fails here, should I mark it for resolution by a team member?
When All Else Fails: Human Interventions
There are times when you’ll run into an issue that can’t potentially be solved by retrying a step, or even a job. One example of this is when a job fails while performing a task that is not idempotent, one does not necessarily know what exactly the outcome is. This was not so much a concern for our example, but for a flow where you are, say, creating a medical record that you cannot afford to have a duplicate of, repeated retries may not be an option. Another example of this is when the website that is being automated receives an update- a change in the user interface that necessitates a change in the code.
It’s difficult to expect these circumstances, and as such, building in functionality to the dashboard which lists the failed tasks so that a team member can investigate these cases and mark them as done is a good way to go.
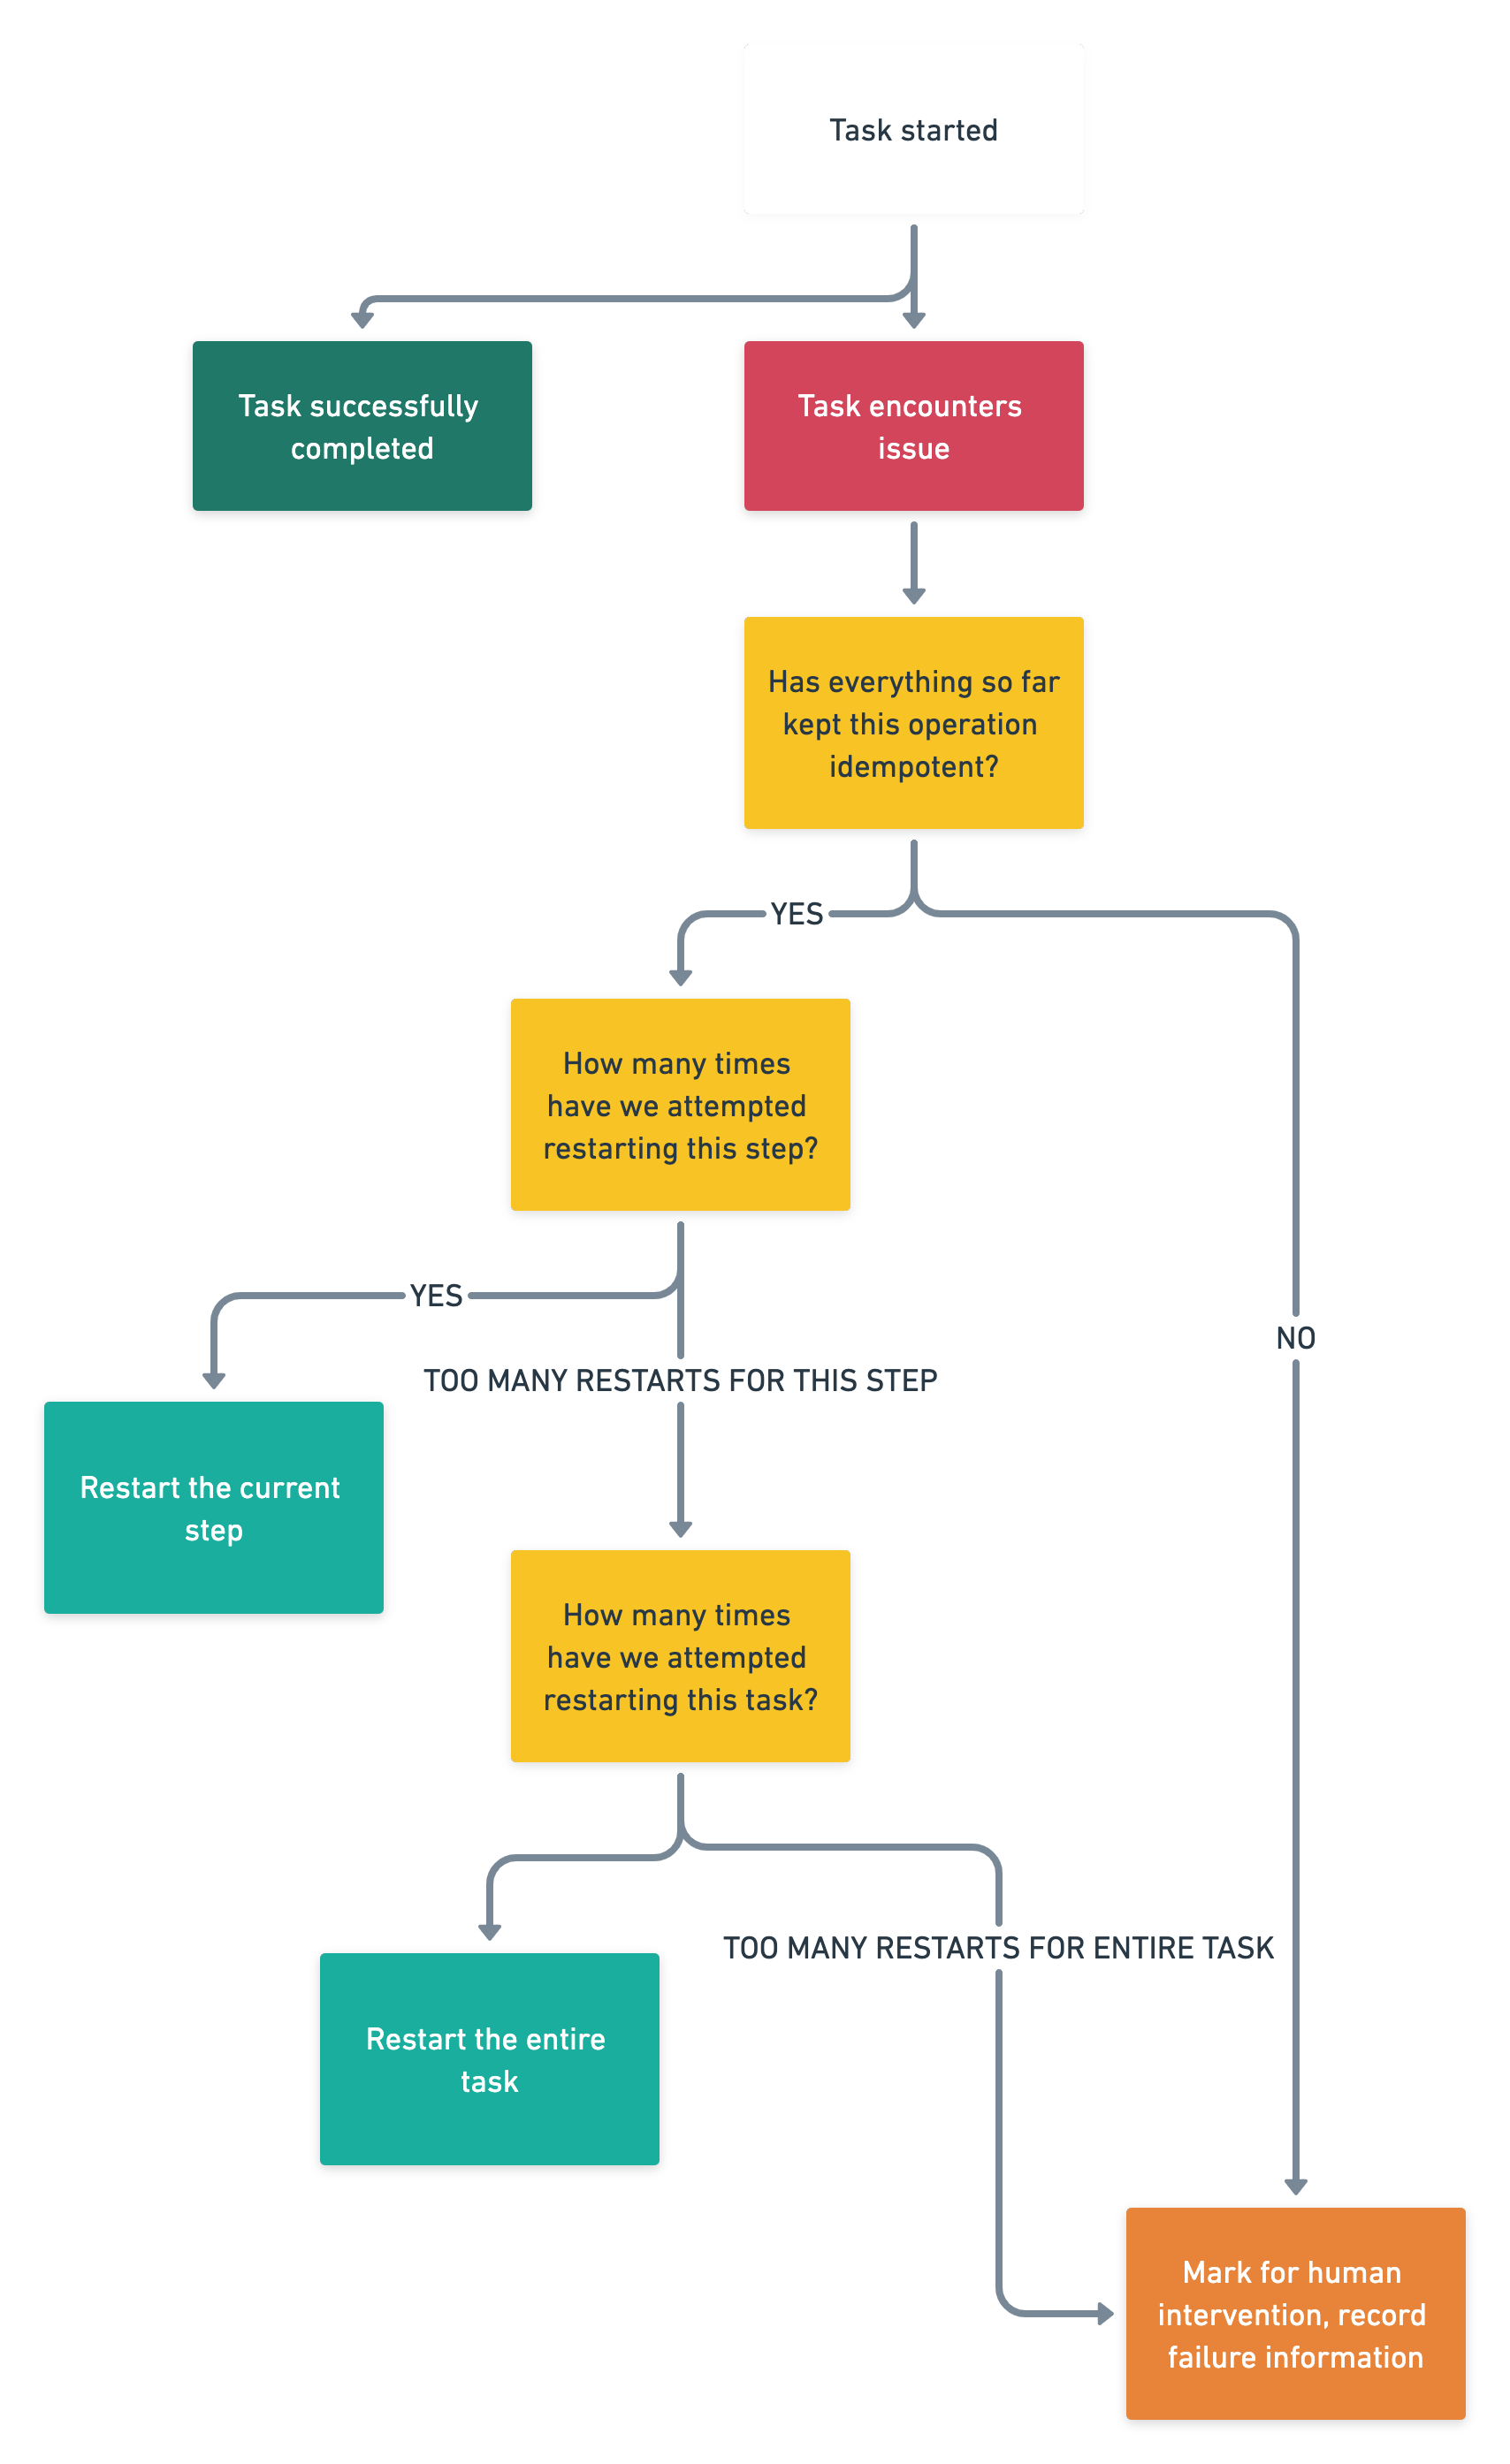
Life of a Selenium Job
By synthesizing all the previous points into a single logical model, we can determine a framework for which we can build out error handling and facilitate human interventions for our Selenium Jobs. Below, you can find an example of a high level model that one can use to properly keep track of and handle errors for their Selenium jobs in a production environment.
Takeaways
Selenium is not a solution that can be applied to any problem. In fact, a great use case for this technology is in rapid prototyping, where one often does not need the buy-in of anyone.
However, note our biggest victory here- we were able to build a reliable, production-grade tool that queries an external service and provides us a list of vaccines, all without an ounce of buy-in from the actual service provider, vaccines.gov. To them, we appear as another internet user, clicking around their website.
At a company where speed really is everything, the ability to deliver complex external integrations with virtually zero buy-in is incredibly valuable, and Selenium has proven to be an excellent tool that helps us achieve this.
If you’re interested in building the future of healthcare or are curious to learn more about our tech infrastructure, feel free to contact us at careers@athelas.com or apply directly on our careers page: https://www.athelas.com/careers.